How to Plan a Trip With Trello
Also known as "how to make your vacation not a headache"
I like to travel, and I love Trello. It’s a great day when I can combine both of those worlds.
Everyone has their own method for keeping track of their travels, and I’m not here to tell you spreadsheets and word docs are the wrong way to do it. Instead, I’m going to show you that they are. 😂
Spreadsheets are a nice way to organize costs, I’ll give you that. But it’s difficult to visualize anything in them, and it’s really difficult to thread details together. They can also be difficult to read and access on mobile.
Google docs are fun, and not a totally horrible experience on your phone, but you end up needing to scroll for everything and it feels more like reading a book than quickly grabbing information.
Trello is easy to access from my phone, let’s me zoom out to see the whole picture and then zoom into to a specific part of the picture and get the details I need. I don’t have to hope my email opens or hope that I tagged some confirmation email correctly - it’s just right there in Trello.
For Atlassian’s Community competition called the Atlympics, there's a specific Trello-themed event to build a beautiful Trello board planning a trip to the Olympics. So I’ll be walking through that example for this post, but if you’ve got an upcoming trip planned, I encourage you to follow along and see if you don’t love the way your trip is organized nicely by the end of it.
Let’s get started, shall we?
Build out your structure
There’s a million ways you could tackle this, but after trying nearly all of them, my favorite is this.
The first list holds all of my reference and details. When I create the board, at first it just holds as many details as I have in my head. Like … where am I going? And when? Who’s joining on the trip?
The next list is my task manager. I know I know, this is a bit weird… shouldn’t I be doing Trello the other way around and having lists for all those stages rather than putting them in one list? You can. I find that’s just more lists than I like having in a board, and I’d rather have more room for my other lists which are ….
The itinerary!! This is the meat and potatoes of my board. I created a list to hold all the possible things I might do, and then each subsequent list is a day of my trip. You can call it Day 1 / Day 2, etc, or day of the week, Monday / Tuesday , or the actual date Aug 1 / Aug 2, etc. Totally up to you and your preference.
Alright you’re all set up. Now let’s get to trip planning.
Add your to-dos
better yet, make Butler do it for you.
Every trip has a lot of things to do. You have to order things, reserve things, pack, set up OOO emails, etc. As much as I love traveling, the stress of feeling like I might have forgotten to pack or do something important used to really bother me. Then, I started keeping it all in Trello, so I knew what I had done and still needed to do.
Funny how it worked out so much better when I kept it somewhere else besides my brain that was already keeping track of ten thousand other things.
I wont belabor this point, because you get it. Add your to-dos under the Not Started card, and then as they progress, move them down.
And the best part is, some of it, you can automate with Butler. For instance, I have a really special method with packing. There’s the “initial pack”, then there’s the day before pack, and then there’s the day of pack. And then there’s a rechecking of all I’ve packed. Yeah, it’s weird, but ask me how many times I’ve ever missed something I really needed on a trip?
I used to make all these checklists by hand, and it got a little difficult to remember which card they were on if i was copying it, so I created a rule in Butler to apply all of those checklists to any card with “Pack” in the card name. And it works just like a dream.
Pretty cool, right?
Add more to your reference as you get it
As you start getting some confirmations solified, update your reference list with them. You know, things like confirmations and details for your flights, rental cars, hotels, etc.
You can easily attach a screenshot or order confirmation PDFs right to the card so you have those numbers handy when you go to check in or check the details.
You can also use due dates to show which dates those things are being used, and if you have Business Class it’s easy to view on Calendar or Timeline View. (Don’t have BC? Just add the Calendar Power-Up.) It’s a quick way to notice any gaps (like oh no, I booked the hotel for an extra night!)
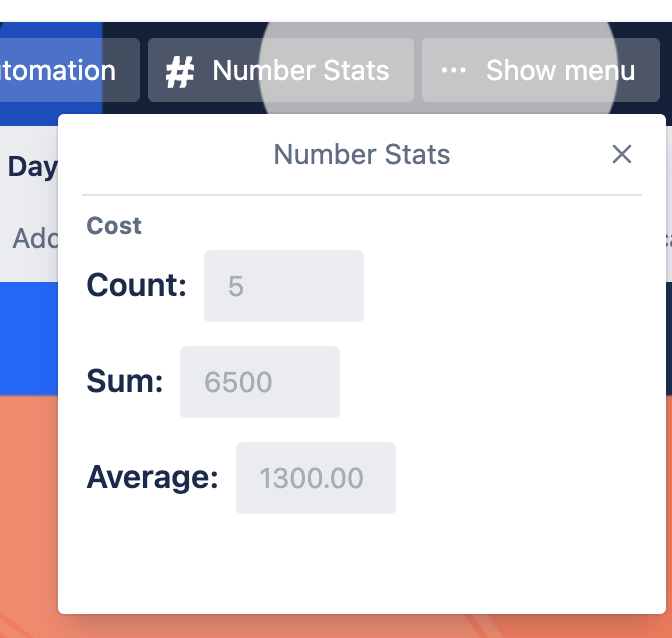
If you want to keep track of costs in your Trello board, just add a custom number field and for each item, like flights, hotels, activities (more on that in a minute), add the amount. If you add the Numbers Stats Power-Up to you board, you’ll be able to see a sum of everything in that field across your board.
Add ideas to the list
Okay now for the even more fun part. Let’s plan what to do!
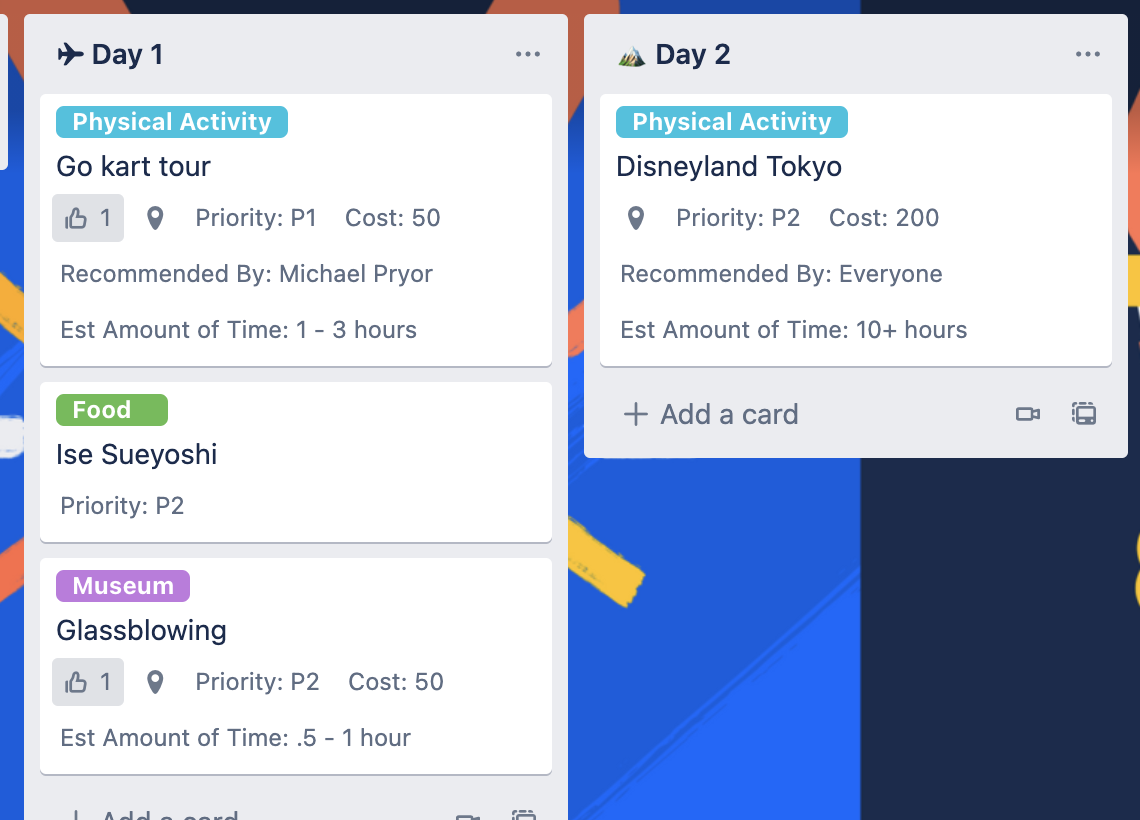
Brainstorm every possible thing you can think of doing. Each activity is its own card. You can add as many or few details as you want. I like attaching links to mine. If dates are relevant (only happens on a certain date you’re there) you can add it there as well. If someone recommends it, you can even indicate that on the card (I find this to be helpful because then you can be like “you told me to do this thing, and I did and you were right - was totally amazing!)
PS - Did you know you can easily add links to your board from anywhere with the Trello Chrome extension and the mobile share options?
Use labels to distinguish types of activities, like Food and Dining, Physical Activities, Museums, etc.
You can also add custom fields for thing like priority (I have a nice drop down for P1, P2, and P3, that way I can rank things by “must do” or “would be nice if we have free time”.) And estimated amount of time it would take, as this will come in handy when you’re trying to sort them all. You can include anticipated cost for those activities.
And … my favorite part… you can add locations for each of these and view your board in Map View to see what is near each other.
Lastly, if you have multiple people going, you can add the Voting Power-Up and give everyone the ability to upvote their favorite activities. It’s an easy way to let get a say in what happens, and organizing is easy because you can see the number of votes a card has on its cover.
Sort your itinerary
The rest is pretty simple! Now you just figure out what you can afford and have time for, and you drag those cards to the corresponding days they fit! If you’re not one of those intense itinerary planners and you know you want to do an activity but don’t know which day, then don’t worry about assigning it to a specific day. Just make your lists be categories (like food, strenuous activities, relaxing activities, museums, etc.) instead of days.
Post trip recap
After your trip is complete, you can pretend this board never existed. Or you can add more details to it and consider it a handy souvenir and scrapbook!
You’re thinking… MOAR DETAILS!? WHAT MORE CAN I POSSIBLY ADD TO THIS BOARD?
Well, you can review the thing you did Yelp style. That way when people are like “oh you went to x, how was y?” You don’t have to remember off the top of your head. You can go look in your Trello board. Use Custom Fields, or you can just add a comment to the card or update the description.
If you want, you could even update the card with photos from that activity!
This is great for sharing with other people if they want to know how your trip went, or if they are planning a trip to the same destination. (If you don’t want to share freely, you could charge for access to your board, or offer for people to buy you a coffee and then you can take that money to sponsor your next trip!)
Bon voyage
Now you’re ready! No more worrying about what’s going to happen and where you’ll be. I’ll admit, I don’t do this for every trip, but if there’s a trip that last for more than a couple days and doesn’t involve staying with family or is in a place I’ve never been, you better believe I’m whipping out a Trello board.


